Thursday, October 31, 2013

Happy Halloween!!!

Frank is really into the Halloween spirit. We bought these pumpkins so that we could carve them.

Frank's pumpkin is suppose to be the Governor from Walking Dead. You can see the scar in his eye that Michonne gave to him.

Here, you can see a sword in one hand.

On the other hand is a gun.

This is my pumpkin. I wanted to try something more challenging so this is what I chose. The Hello Kitty Witch. It was fun carving these pumpkin. With the seeds, we roasted them and snack on them.

This year is a quiet halloween, it is rainy out plus being in a walk up kids don't come by.

Wednesday, October 30, 2013

Pretzels

I really enjoy a good pretzel! My favorite treat is the Almond Crunch at Auntie Anne's, especially when it is just out of the oven. Having indulged myself in the land of youtube, I found this recipe to make soft pretzels from Laura in the Kitchen. I don't like a salty pretzel so instead I topped my with chopped almonds. It was missing something though, so I will rework that in the future. Also, Laura's recipe makes a dozen, but they are actually small pretzels. I wasn't sure how much to roll it out, so they were about 4X6 size wise. I made some into pretzel bites as well.

Also, this recipe has you do a baking soda to water dip. Shortcut is to boil water and put it in a bowl with baking soda and dip the pretzels. Optional if you don't have a big pan.

This is how my pretzels turned out.

These are delicious right out of the oven. The baking soda water dip will give you a crunchy crust and a soft inside.

I kept the rest in a tight sealed container and would toast it to reheat it. I thought about making just half a dozen because a dozen pretzels seemed like a lot, but we actually consume half a dozen on the first sitting.

I made chili earlier this week, so that is the topic for the next blog.

Thursday, October 24, 2013

Recovery

I have been sick since last week, but it really hit me on Tuesday. I was congested and my ears were crazy popping. It sucks when you have all this snot and you blow your nose and your ears pop. It's Thursday now and I have been resting, ears minimally popping and congestion has gone down. Still sound nasally though. I think it is due to my allergic rhinitis. For which I ran out of my Rx. I am too lazy to go to the doctor just yet, since I have yet to find one. I substitute it with a saline solution. I think that is sufficient. I was actually able to be more productive today. I put some garlic ginger chicken in the crock pot for dinner and made mini spinach quiches. Overall, much better than the past two days where I slept most of the day.

I was looking up crock pot recipes and this is where I ran across the mini quiche recipe. I reworked a recipe from Pillsbury. I used my left over pie crust dough from when I made apple pie. Which was Ina Garten's perfect pie crust recipe. You can also use the puff pastry ones from the store if you are lazy. I substituted the half-and-half with 1/2 tbsp of melted butter and milk to fill up 1/2 cup. I didn't have any on hand so this works.

Ingredients:

Left over pie crust dough or 1/2 portion of store bought pie and pastry dough

2 eggs

1/2 cup half-and-half or 1/2 tbsp melted butter with milk up to 1/2 cup portion

1/3 cup grated Parmesan cheese

1/2 teaspoon seasoned salt or garlic salt

1/4 teaspoon pepper

9 oz chopped spinach (can be frozen too)

3 tablespoons chopped green onions

Instructions:

1. Heat oven to 425°F. Knead dough until softened and no longer crumbly. Roll out and use a 2 inch round circle for mini pie crust. Use flour as needed. Make sure to extend dough 1/4 inch above edge of cup.

2. In medium bowl, beat eggs. Stir in half-and-half, cheese, garlic salt and pepper. Stir in drained spinach and green onions. Spoon about 1 tablespoonful mixture into each crust-lined cup.

3. Bake 16 to 18 minutes or until puffed and golden brown. Cool 5 minutes before carefully removing from pan to cooling rack. Serve warm or cool. Store covered in refrigerator.

I let it cool for about 5 mins before transferring it onto a cooling rack.

This is how the quiche turned out.

Next time, I make this, I am going to use a Puff Pastry Dough like for Egg Custard Tart and probably use the molds for it as well, perhaps. Also I wouldn't use the seasoned salt. I thought it was too salty. I might swap for onion powder instead. Enjoy!

Thursday, October 17, 2013

Throwback Thursday

Coined as a result of social media, Throwback Thursday (#tbt) was born. Typically, I don't participate in such activities, but I was cleaning out my albums, and blow me down, it was a blast from the past one after another! This resulted in me photo texting these classical pictures. I surely found some interesting picture that the owner would cringe in seeing and thus request obliteration of such article. All in good fun....the bright side to cleaning up.

It takes us a while to finish up a bag of coffee. We finally finished the one we bought from Costa Rica. I opened a new bag today, also from Costa Rica. This blend is 100% Arabica coffee from Cafe Santa Marta, which is a Farmer-Direct. What does that mean? It means that the Farmer-Direct coffee comes directly from coffee farmers who grow coffee, harvest it, remove it from its pulp, sundry them, mill them, where there it no middle man. Essentially you know the coffee's origin. It is sustainable. These Farmer-Direct bag support the families and communities where the coffee came from. If you are a coffee enthusiast you can read more about them here.

This is the coffee that we are going to be drinking until we finish up this batch. It is a Peaberry Coffee.

Peaberry coffee comes from a single bean from the coffee fruit. Usually there are two beans. It is smaller in size than regular coffee beans. Some consider this to be of higher quality; for it is a rare and natural variation from the usual Costa Rican coffee bean. It yields 3-5% of the entire crop. It is more robust and intense, aromatic and smoother than the regular Costa Rican Beans.

Monday, October 14, 2013

Chapchae

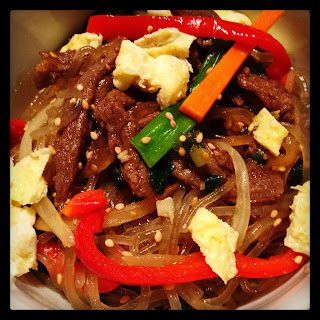
One of my favorite things to eat is Chapchae. This is my second attempt at making it and it was much better than the first. The first time I made it, it was lacking flavor. When I boiled the noodles, I didn't add salt and I forgot to add the sesame oil until later. This time around, I made the bulgogi to add as the meat and it really made a difference. The marinate in the bulgogi really brought out the flavors.

Making Chapchae might seem a little time consuming because of all the things you have to add to it. You can pretty much pick and choose what veggies you want to add to it and stir fry then a little bit and continue piling it onto your noodle base. There are the veggies that I used.
Once everything is all cooked you mix it up and get this finished product.
As garnish, I cooked up an egg crepe style and sliced them and there you have it.

Japchae
Serves about 7-8 people

Ingredients:
1 bag of Sweet Potato noodles (dangmyeon), boiled 8-9 mins, then cut twice.
1 king oyster mushroom (you can use any kind of mushroom you like), julienne sliced
1 carrots, julienne sliced
1 red pepper, julienne sliced
1/4 of an onion julienned sliced
4 stalks of green onion chopped
1/2 brunch of spinch chopped
2 T soy sauce
2 T sesame oil
1 T sugar
2 eggs (optional)
Sesame seeds
Olive oil

Instructions:
1. Using a frying pan heat up olive oil on high to cook beated eggs crepe style, and lower heat to medium. Once egg is cooked set aside, let cool and slice into strips.
2. Cook Bulgogi. See previous blog on how to cook Bulgogi.
3. Boil noodles for 8-9 mins until cooked. Then place in a bowl and cut 2-3 times. Theses noodles are long. Add soy sauce, sesame oil and sugar. Mix it up.
4. Start cooking vegetable on a wok or frying pan. Heat up pan with oil on high. It takes about 2 mins per veggie. you can do it all at the same time or one by on or two by two. I did it in increments of two; I cooked the mushrooms with the onions. Then put that in the noodles. Then I cooked the carrots and red pepper. Then the green onions with the spinach. Re-oiling the pan each time.
5. Once all the vegetables are cooked. Mix it all together. Then add the Bulgogi. Add the Egg. Mix it all up to combine.
6. Serve and enjoy!

Sunday, October 13, 2013

oh dear

I went downstairs to get the mail and on my way up as I was opening my mail, I walked into the wrong house greeted by a chihuahua and a guy saying "Hello!" I was so embarrassed and scared because of the chihuahua and walking into the wrong house. The door was open, who knew? I screamed and apologized....my neighbors probably think I am weird.

Friday, October 11, 2013

Starting from scratch.....

Have you heard of the saying, "I made it from scratch." Well, I made these from scratch. It's true, it does taste better when you make it from scratch. Yesterday was a day in the kitchen! I am kinda sore from today.

I wanted chessy corn muffins so I whipped up a batch, but from the Jiffy corn muffin mix. I added cheese to make it chessier, but the texture was too crummy. So I realize that if I want some delicious corn muffins, I am going to have to make it from scratch. That's the lesson here. But I must add, if you don't have the time, the box mix is a good substitute. These days, I have all the time in the world, so its no excuse for me.

Frank really likes apple pies so I decided to give it a try. I watch cooking/baking videos on youtube and that is where I get some recipes and techniques. We had some apples as well, so why not. I think it's also the season for apple picking.

The recipe I used for the crust is from Ina Garten. I also want to reference Laura in the Kitchen; I watched her video to get a visual of how the crust should look like. I wanted a flaky crust, so the secret is you have to work fast and keep everything cold. It is actually really fast and easy to make when you use a food processor. It is the clean up that takes longer. I would highly suggest making your own pie crust. This is how mine turned out.

I was pretty happy with how this turned out. With this recipe you have to refrigerate it for at least 30 mins before using it.

For the Apple Pie recipe, I used one from Eugenie Kitchen. I didn't use the lemon juice though because my apples did not need it. I used about 4 apples. The eggwash will give the pie a nice shine and I sprinkled it with cinnamon and sugar to give it more taste and color. Skip the cinnamon if you don't like it. This is an exception for me, I am not usually a fan of cinnamon. It is actually pretty simple to make. I went with a lattice top because I though it looked pretty. See.

It just requires patience because you have to wait 2 hours to let it cool before you can eat it. Oh the torture! If you cut it to early the juices with run and you will have a soggy crust. Patience! Here's how it turned out.

I also made some Bulgogi because I was making some Chapchae. I've never made Bulgogi before, so I found this website and used it as a concrete to make my version of Bulgogi. Instead of ribeye, I used steak but cut it in strips.

Bulgogi Recipe:

1 steak cut in strips

⅓ cup of soy sauce

3 T sugar

1 T sesame oil

3 cloves of garlic, minced

¼ tsp of red pepper flakes

2 pinches of black pepper

¼ medium onion, halved and sliced into medium moon shaped slivers

3 green onions including the white parts, finely sliced into small pieces

1 T sesame seeds

Cooking time!

1. Combine and whisk soy sauce, sugar, sesame oil and garlic in a bowl. Once sugar dissolves, pour into steaks, add red and black pepper. Cover and let marinate for an hour in refrigerator.

2. Heat up wok (or pan) with oil on high. Add meat with marinade. Cook for 2 minutes then reduce to medium heat and add onions. Heat for another 2 mins until meat is cooked. Then top with sesame seed.

This is what the meat looks like once its marinated. It absorbs all the seasoning for a tasty piece of meat.

And here is the finished product.

Next time, I might blog about chapchae, until then.....

Friday, October 04, 2013

Macarons, First Attempt

I've never made macarons before. I was just a consumer. My friend, Kim, introduced me to these delights one summer in Sacramento. She took me to Ginger Elizabeth where you can have an Ice Cream Macarons sandwich. Since then, I have consumed all sorts and flavors. The best savory ones I have had were from a client. They were from the little door in Los Angeles. A couple nights ago I dreamt I made some savory macarons.

Anyways, yesterday I was on a quest to find some black sesame powder to make the macarons. Luckily, they had it by a local grocery store. Making macarons you have to be precise. I actually didn't have a scale to measure things out but the recipe I found online used typical measurements. After searching high and low for the right recipe, I decided to go with the one I found on Amy's Food Adventures. She owns a dessert place in Toronto. I found her blog quite helpful since I no longer had to do any measurement conversion. Most of the ones I watched on YouTube used gram measurements. I also found this video from yoyomax12 on YouTube very helpful getting the right technique down.

When making macarons you have to wait until the batter is completely dry before you bake it in the oven. It was very humid today so I had to wait an hour and 20 mins for my drying process before I could bake these little delights. This is what they look like as they are drying.

I baked them for about 18 mins at 300 degrees F. And they turned out like so.

You have to let it cool completely before you fill them. I used a black sesame buttercream filling. I used Amy's Vanilla Bean Recipe but omitted the vanilla bean paste and used 4 tsp of black sesame powder instead.

Overall, for my first attempt I am happy that I got that nice egg shell appearance, but the foot wasn't as solid so I will need to troubleshoot that in the future. I also thought it was little sweet and wanted more nutty-ness from the black sesame. Next time, I may add less icing sugar and more almond meal or black sesame powder. I would also use a different filling, not a buttercream, perhaps a ganache.

The final product: Black Sesame Macarons with Black Sesame Buttercream.

Next, I am going to try making earl grey macarons...maybe.

Homemade

Lately I have been experimenting with making ice cream. I attempted making Fresh Peach Ice Cream. When making ice cream there is a good amount of prep work like freezing your ice cream bowl and your mixture before you churn it. Those are key and will make for great consistency. I wasn't so patient when I made the Fresh Peach so the consistency wasn't was great. In part it is probably the recipe I used. But it turned out tasty. Here it is, Fresh Peach Ice Cream.

I have also been craving those baos, I made a veggie one inspired when I had a shiitake bun at momofuku in NYC. I deep fried shiitake mushrooms with beets and carrots and some garlic, made some special sauce and voila!

I was quite happy with how these turned out. I made them again the next day, but baked the ingredients instead of deep frying, I suppose it's healthier.

I made another attempt to make ice cream because I wanted to get the consistency down. So I decided to make Coffee Ice Cream. I was definitely much happier with how this turned out. I adapted the recipe from Laura in the Kitchen but opted to take out the Chocolate Chunk and pressed my coffee with a mixture of instant, so for a pure coffee flavor. Here's a picture of how that turned out.

Right now I am making Black Sesame Macarons and am waiting for them to dry so I can put them in the oven. It took an hour or so...geezzz!